THE INTERNET OF THINGS
INTRODUCTION
This manual is based on Raspberry Pi and will start from very basic, assuming that you just came to the world of processors and will gradually cover complex labs that are required to understand the application of Internet of Things and Controls. We will learn to use it as a development board. It is impossible to cover everything that the Raspberry Pi is capable of, because the boundaries of the RPi is defined by your imagination. Hence, this manual serves as a guide to get you familiar with the RPi’s functionality by executing several labs that will give you the skills you need to develop your own projects.
Video Tutorial can be found on my Youtube Channel
from IPython.display import YouTubeVideo
YouTubeVideo('qL2ClHYEuog')
What is a Raspberry Pi?
The Raspberry Pi is a credit-card sized single-board computer (SBC) and development board, which is heavily used for the prototyping of IoT based products. However one key aspect that makes the Raspberry Pi so brilliant for schools is its ability to execute “Python” coded programs. This allows us along with the General Purpose Input Output (GPIO) pins to create programs that can control anything from a single LED to opening your garage door.
%%html
<img src="http://linuxgizmos.com/files/pi_modelb+_infographic.jpg" , width=600, height=300>

The Raspberry Pi 3 is the third-generation Raspberry Pi. The following are its on board components:
●ARM CPU/GPU -- This is a Broadcom BCM 3287 System on a Chip (SoC) that's made up of an ARM central processing unit (CPU) and a Videocore 4 graphics processing unit (GPU). The CPU handles all the computations that make a computer work (taking input, doing calculations and producing output), and the GPU handles graphics output.
●GPIO -- These are exposed general-purpose input/output connection points that will allow the real hardware hobbyists the opportunity to tinker.
●RCA -- An RCA jack allows connection of analog TVs and other similar output devices.
●Audio out -- This is a standard 3.55-millimeter jack for connection of audio output devices such as headphones or speakers. There is no audio in.
●Camera Connector -- 15-pin MIPI Camera Serial Interface (CSI-2)
●Display Connector --Display Serial Interface (DSI) 15 way flat flex cable connector with two data lanes and a clock lane.
●USB -- This is a common connection port for peripheral devices of all types (including your mouse and keyboard). There are 4 USB2.0 Connectors.
●HDMI -- This connector allows you to hook up a high-definition television or other compatible device using an HDMI cable.
●Power -- This is a 5v Micro USB power connector into which you can plug your compatible power supply.
●SD card slot -- This is a full-sized SD card slot. An SD card with an operating system (OS) installed is required for booting the device. They are available for purchase from the manufacturers, but you can also download an OS and save it to the card yourself if you have a Linux machine and the wherewithal.
●Ethernet -- This connector allows for wired network access
What are the GPIO Pins?
Visible in the two below picture, the GPIO pins are located on the Raspberry Pi in the top right corner. These pins are a physical interface between the Pi and the outside world. At the simplest level, you can think of them as switches that you can turn on or off (input) or that the Pi can turn on or off (output). Of the 40 pins, 26 are GPIO pins and the others are power or ground pins, plus two ID EEPROM pins.
%%html
<img src="https://cdn.sparkfun.com/assets/learn_tutorials/4/2/4/header_pinout.jpg" , width=600, height=300>
What are they for? What can I do with them?
You can program the pins to interact in amazing ways with the real world. Inputs don't have to come from a physical switch; it could be input from a sensor or a signal from another computer or device, for example. The output can also do anything, from turning on an LED to sending a signal or data to another device. If the Raspberry Pi is on a network, you can control devices that are attached to it from anywhere and those devices can send data back. Connectivity and control of physical devices over the internet is a powerful and exciting thing, and the Raspberry Pi is ideal for this.
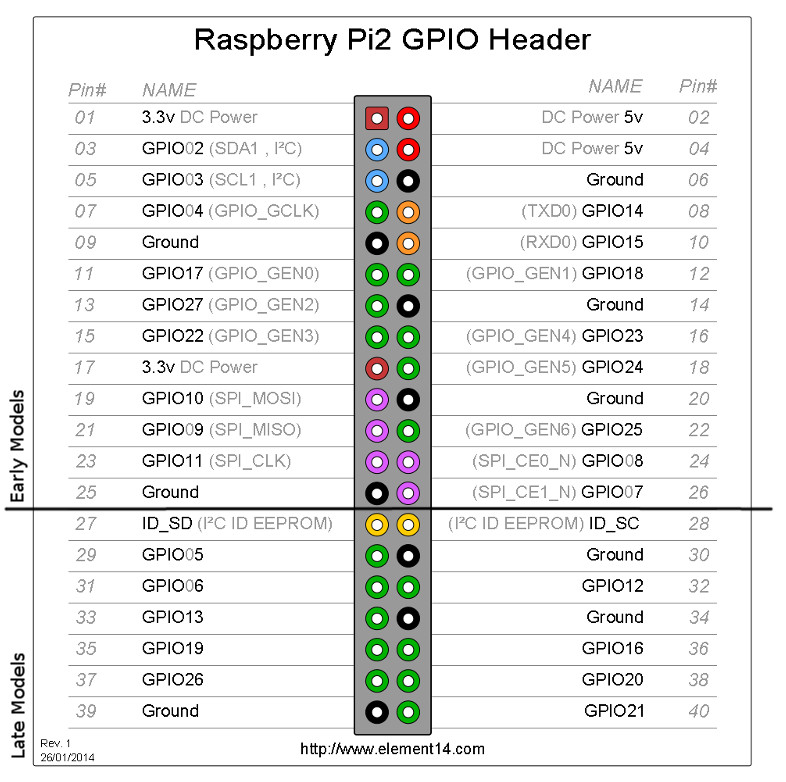
Pin Numbering System
Raspberry Pi pins are numbered in two different ways - Physical numbering and Broadcom numbering (BCM). In the first case, the pins are numbered sequentially from one to 40. In the Figure 2, this is shown as Pin#. And the image represents what is seen when the Pi is held with the USB ports facing downwards. That is, Pin 2 is the pin in the corner. The Broadcom numbering system is the default option for the SoC (System-on-Chip). This is also known as GPIO numbering and is shown as Name in the Figure 2.
As you have probably guessed already, all the pins are not programmable. There are eight ground pins and two +5V pins and three +3.3V pins, which are not programmable. There are other dedicated pins too. Most of the pins have alternative functions, as shown in the figure. A majority of the pins are directly connected to the SoC; so while connecting circuits or components, one should be careful to avoid wrong wiring and short circuits. It is always good to have a descriptive pinout diagram printed out for quick reference.
Programming the Pins
The Python package used for Raspberry Pi GPIO programming is RPi.GPIO. It is already installed in Raspbian, the default operating system for Pi. If you are using any other operating system, the package can be installed by using the following command:
sudo pip install RPi.GPIO
The GPIO Programming Workflow
Let us discuss the steps involved in writing a GPIO Python script, in general:
- Import the RPi.GPIO package.
- Set the numbering style to be used. Use the method GPIO.setmode() for this. It takes either GPIO.BOARD or GPIO.BCM as the parameter. GPIO.BOARD stands for physical numbering and GPIO.BCM stands for Broadcom numbering.
- Set up the necessary input and output pins.
- Read inputs and give outputs.
- Clean up GPIO and exit. You must clean up the pin set-ups before your program exits otherwise those pin settings will persist, and that might cause trouble when you use the same pins in another program. To clean up the entire set of pins, invoke GPIO.cleanup().
Set Up your Raspberry Pi
To set up RPi, you will need:
● SD card of Minimum size 4Gb; Class 4 and above
● HDMI for HD TVs and monitors with HDMI input
● RCA video lead (Optional) A standard RCA composite video lead to connect to your analogue display if you are not using the HDMI output.
● Keyboard and Mouse
● Power adapter
● A USB memory card reader
Preparing your SD card:
The SD card contains the Raspberry Pi’s operating system (the OS is the software that makes it work, like Windows on a PC or OSX on a Mac). This is very different from most computers and it is what many people find the most daunting part of setting up their Raspberry Pi.
The following instructions are for Windows users. Linux and Mac users can find instructions at www.raspberrypi.org/downloads
Steps to Follow
Step 1
- Download the Raspberry Pi operating system The recommended OS is called Raspbian. Download it here: https://www.raspberrypi.org/downloads/
Step 2
- Unzip the file that you just downloaded a. Right click on the file and choose “Extract all”. b. Follow the instructions—you will end up with a file ending in .img
Step 3
3.Download the Win32DiskImager software
a. Download win32diskimager-binary.zip http://sourceforge.net/projects/win32diskimager
b. Unzip it in the same way you did the Raspbian .zip file
c. You now have a new folder called win32diskimager-binary
Step 4
You are now ready to write the Raspbian image to your SD card
Writing Raspbian to the SD card
a.Plug your SD card in the card reader and then into your PC
b.Open Win32DiskImager. You should see something like this
%%html
<img src="https://img.utdstc.com/screen/1/win32-disk-imager-001.jpg:xxs" , width=600, height=300>

c.If the SD card (Device) you are using isn’t found automatically then click on the drop down box (highlighted in blue; Figure 3) and select it.
d. In the Image File box, choose the Raspbian .img file that you downloaded
%%html
<img src="https://www.pendrivelinux.com/wp-content/uploads/moblin-image-writer.png" , width=600, height=300>

e. Click Write
f. After a few minutes you will have an SD card that you can use in the RPi.
Step 5
Booting your Raspberry Pi for the first time
a. Connect the keyboard, mouse to the Pi
b. Next, connect the HDMI to the Pi and then to HDMI port on your display screen.
c. Now it is time to turn on our Raspberry Pi. When the memory card, HDMI lead, Ethernet cable, mouse and keyboard are plugged in, plug in the power lead.
As soon as you do this. You screen should be black and filled with white text. This will be visible every time you turn on your raspberry pi.
Step 6
Wait until your screen reads “raspberrypi login:”
● Username = pi [ENTER]
● Password = raspberry [ENTER]
%%html
<img src="http://www.circuitbasics.com/wp-content/uploads/2015/02/lcd-sudo-su.png" , width=600, height=300>

Step 7
%%html
<img src="https://encrypted-tbn0.gstatic.com/images?q=tbn:ANd9GcSHgno6GaHiY-AKMKI6m7dWJev3-r3VwUGScMI4BDCULHXIyBXO" , width=600, height=300>
Programming on the Raspberry Pi
Raspbian comes preloaded with Python, the official programming language of the Raspberry Pi and IDLE 3, a Python Integrated Development Environment.
Python:
Python is a free to use programming language that runs on Windows, Linux/Unix, Mac OS X and has even been ported to Java and .NET virtual machines.
IDLE:
In order to create our python-run programmes we will first need to write them. This is where IDLE comes in.
IDLE is a special text editor software — like Microsoft Word — however it understands the language Python. This enables us to write in a language that our Raspberry Pi will be able to understand and interpret
If you dont have python Make sure to install by followning
sudo apt-get install python3
Key Applications of Raspberry Pi
- Low cost PC/tablet/laptop
- Industrial/Home automation •
- Print server
- Wireless access point
- Environmental sensing/monitoring (e.g. weather station)
- IoT applications
- Robotics
- Server/cloud server


No comments:
Post a Comment